
How to set up an online shop with Mozello in 7 easy steps
E-commerce is booming, with a growing number of people opting for online shopping instead of traditional brick-and-mortar stores. In 2022, worldwide retail e-commerce sales grew to $5.7 trillion, and experts predict this figure will soar to an astounding $8 trillion by 2026. And you, too, can seize the opportunities in this growing industry!
Gone are the days of lengthy setups and daunting costs to open an online shop. Today, all it takes is a passion for online selling, a few hours of your time, and a user-friendly e-commerce platform – such as Mozello.
In fact, it took us less than two hours to put together and launch this test footwear store. In this article, we'll show you exactly how we did it – step by step.
Buckle up, and let's get started!
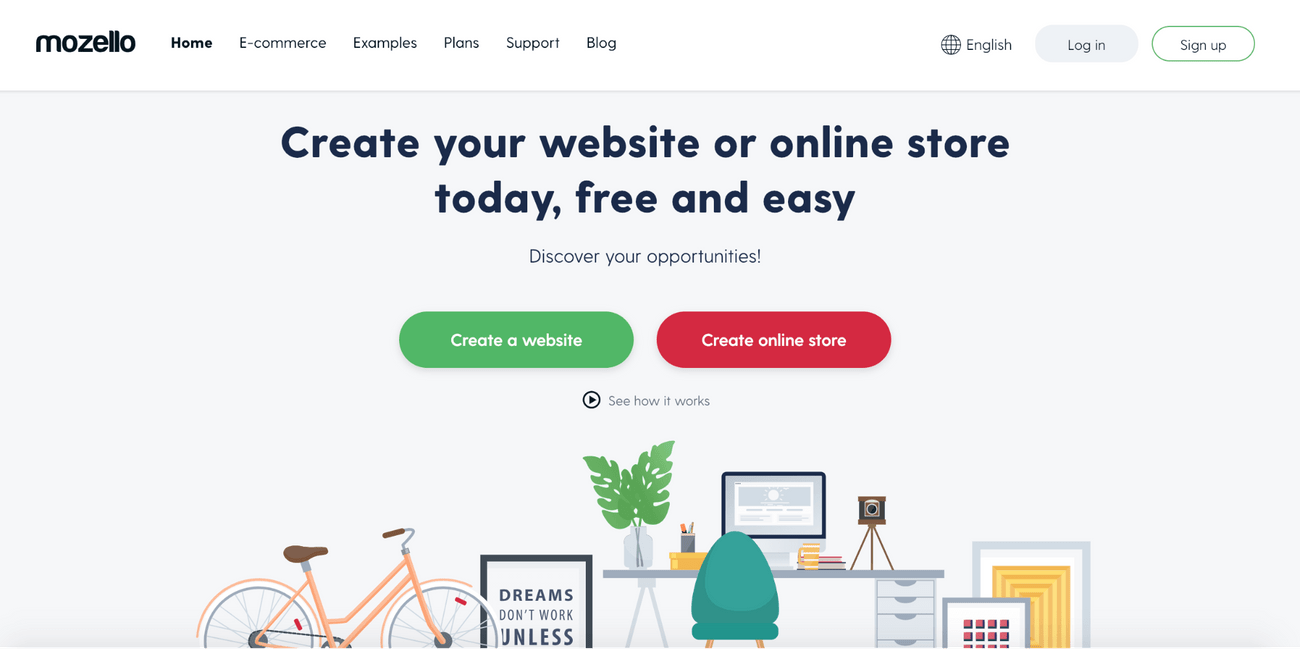
Step 1: Create your account on Mozello
The first step is to create an account with Mozello. Just go to Mozello.com and click ''Create online store''.
Then, type in your email address, choose your password, and click ''Create my website''.
Picking the right store name is crucial for your online business. A catchy brand name provides an instant advantage when launching an ecommerce venture – it helps customers remember you and your product, paving the way for success.
You can either brainstorm ideas yourself or seek assistance from ChatGPT or a business name generator if you need help and don't feel confident in coming up with names on your own.
When you've chosen your brand name, click ''Done''.
Congratulations – you've successfully signed up!
Step 2: Design your website
The next step after signing up is to choose your store's design.
Mozello presents you with a selection of dozens of pre-designed website layouts, all optimized for mobile devices and packed with customization options to meet your requirements. Just scroll through the designs and choose one that resonates with you.
The best part?
If you ever change your mind, you can easily switch your store's design at any time without losing any of the content you've already created.
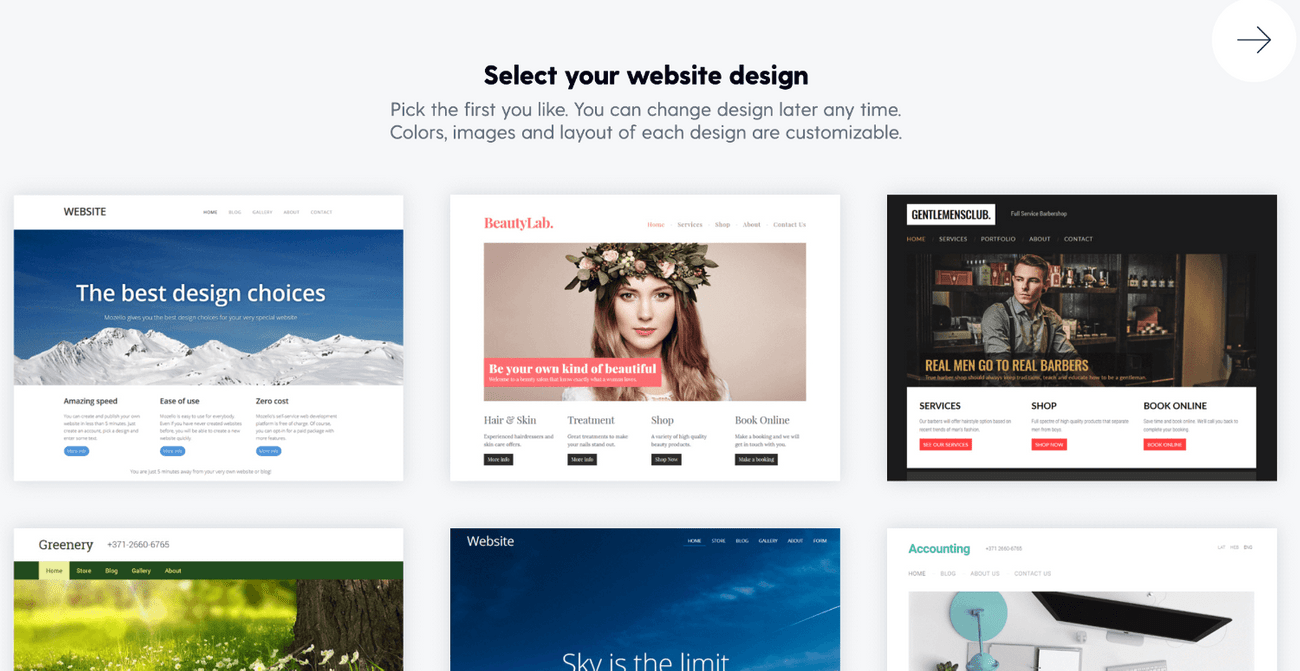
When you've chosen the design, you can customize it as you like. Here are four things to start with:
1: Upload your logo
A logo embodies a company's identity – it differentiates you from competitors and boosts your brand recognition.
What makes a great logo?
It's simple, memorable, and relevant. And ideally, it should include a glyph or visual, as the human brain processes images 60,000 times faster than words.
If you're interested in creating the store's logo on your own, here are ten tips to ensure it turns out great. Alternatively, you can create your logo with tools like Logomaster.ai or hire a freelance designer through Fiverr, 99designs, or upwork. If you prefer a more professional approach, consider seeking design services from reputable agencies or artists.
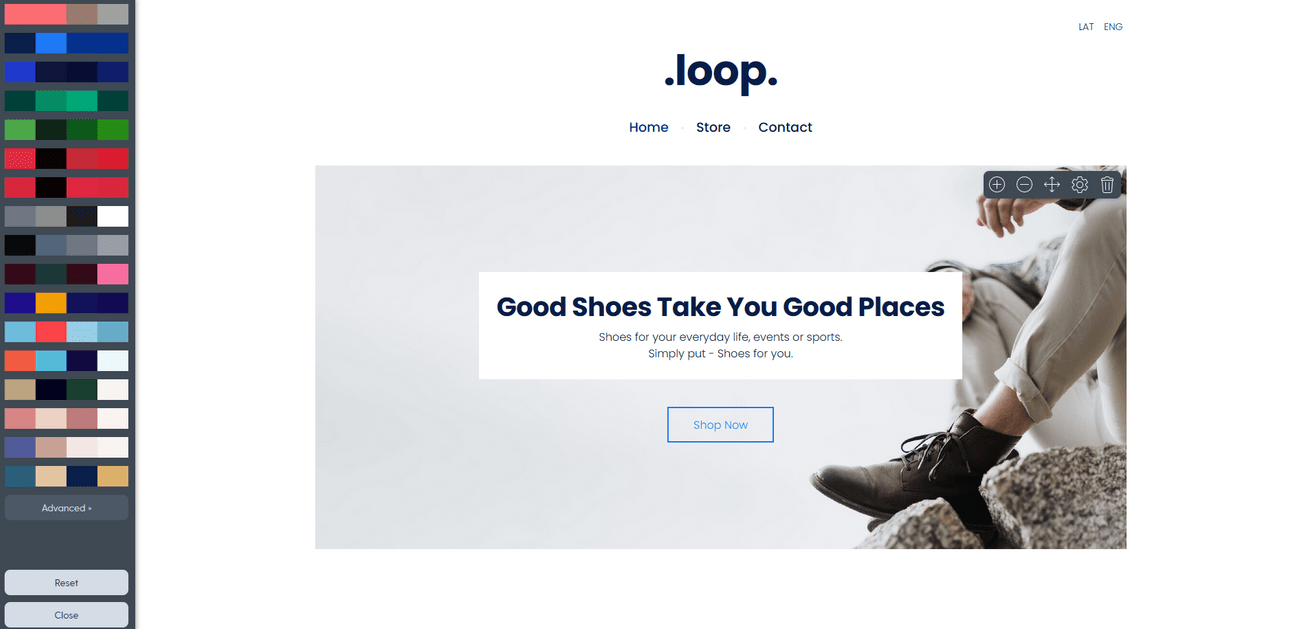
2: Change colors
Although the default website layouts come with pre-defined color palettes, it's a good idea to customize them with your own unique choices.
Consider using Coolors or a similar service to generate cohesive and memorable color palettes to help your brand to stand out and leave a lasting impression. The choice of brand colors can significantly influence how customers perceive your company – so take your time to make the best choice.
Once you've found your perfect color palette, go to Design → Change Colors and set your color scheme:
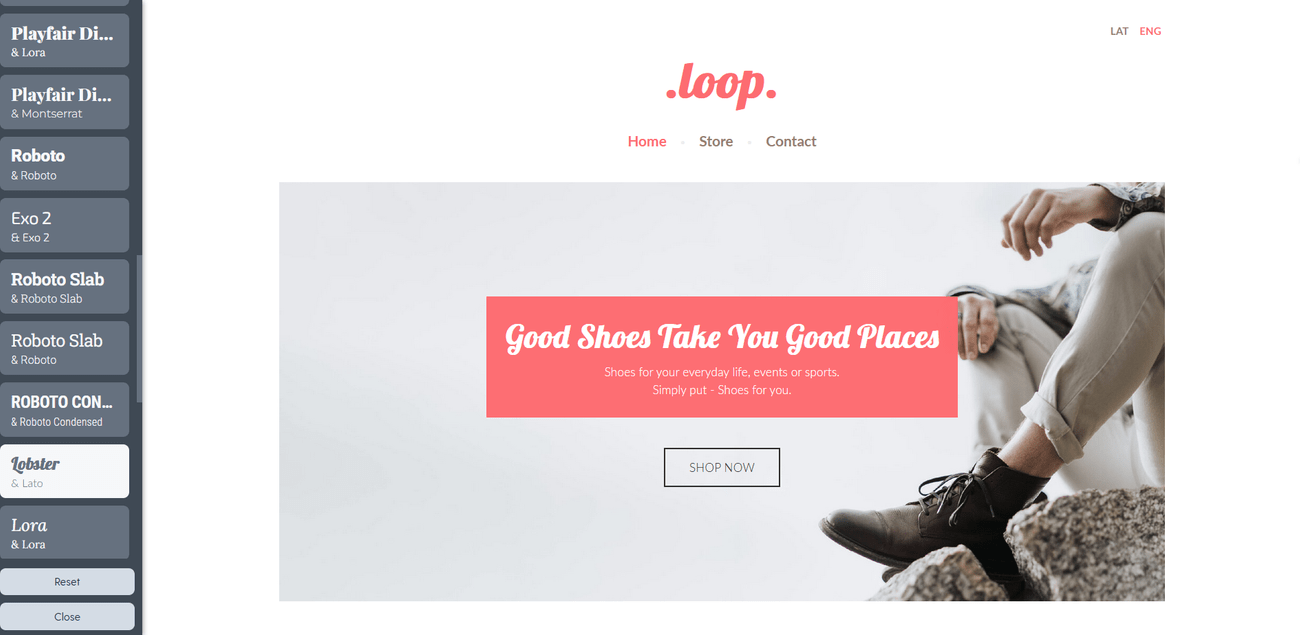
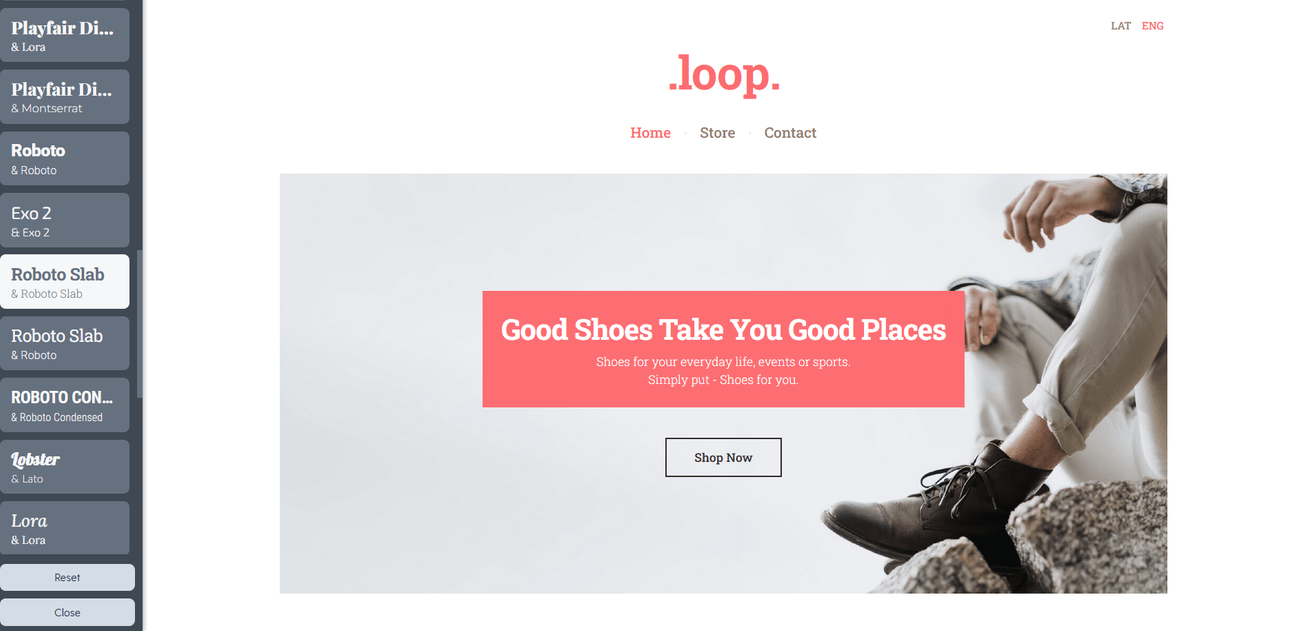
3: Choose your font
When selecting font combinations, consider the nature of your products. You can opt for more serious or playful fonts depending on your offerings.
The idea is to ensure that the chosen font combinations align with the overall feel of your website. For instance, if your website follows a minimalist and black-and-white aesthetic, a handwritten font may not be the best choice.
Changing fonts on Mozello is super simple – just go to Design → Change Font Scheme.
Learn more about web design best practices in this article!
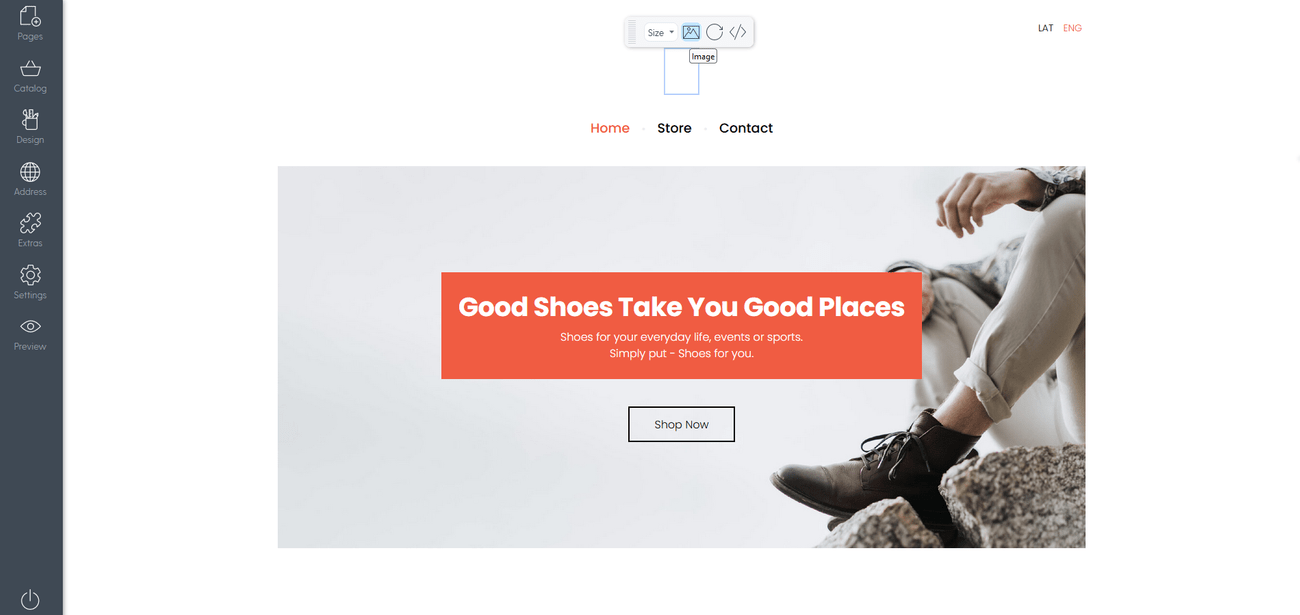
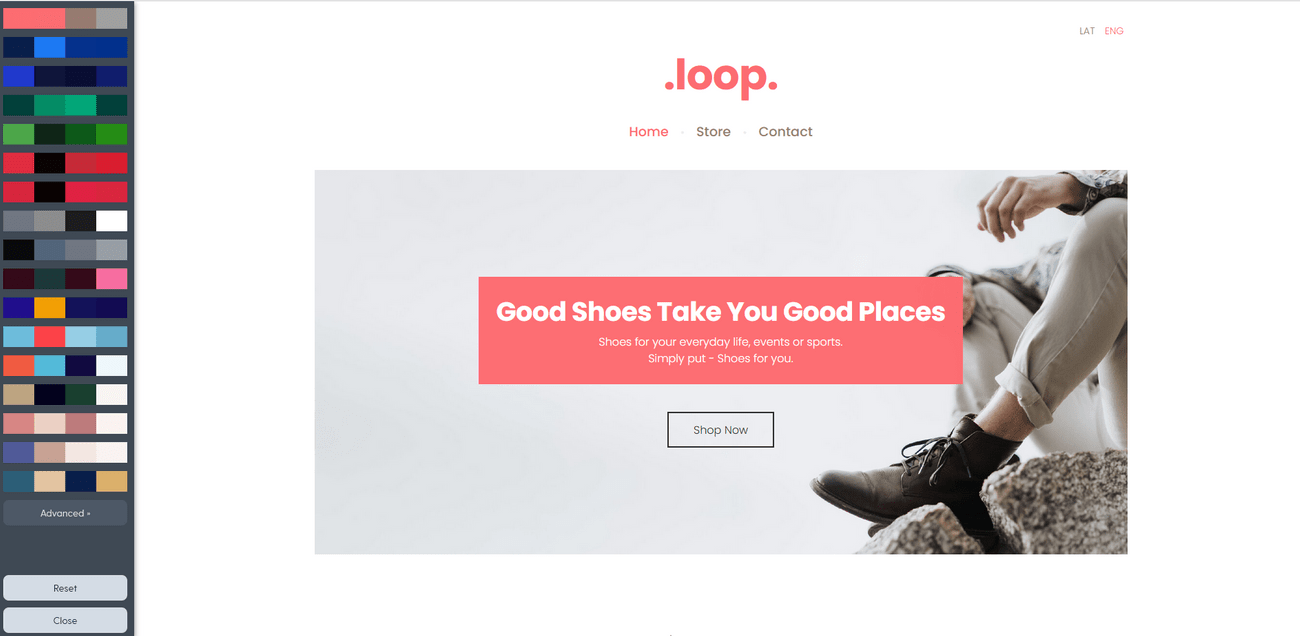
4: Create your homepage
The homepage is your website's front page. Its purpose is to quickly communicate the value of your products to visitors. In other words, the front page of your website must answer these questions:
- WHAT you sell
- HOW your company or the product you sell can help the customer
To start building your homepage, go to Pages → Add new and choose “Front page or special page”. Type in the page's title and address (e.g., Home) and click Save.
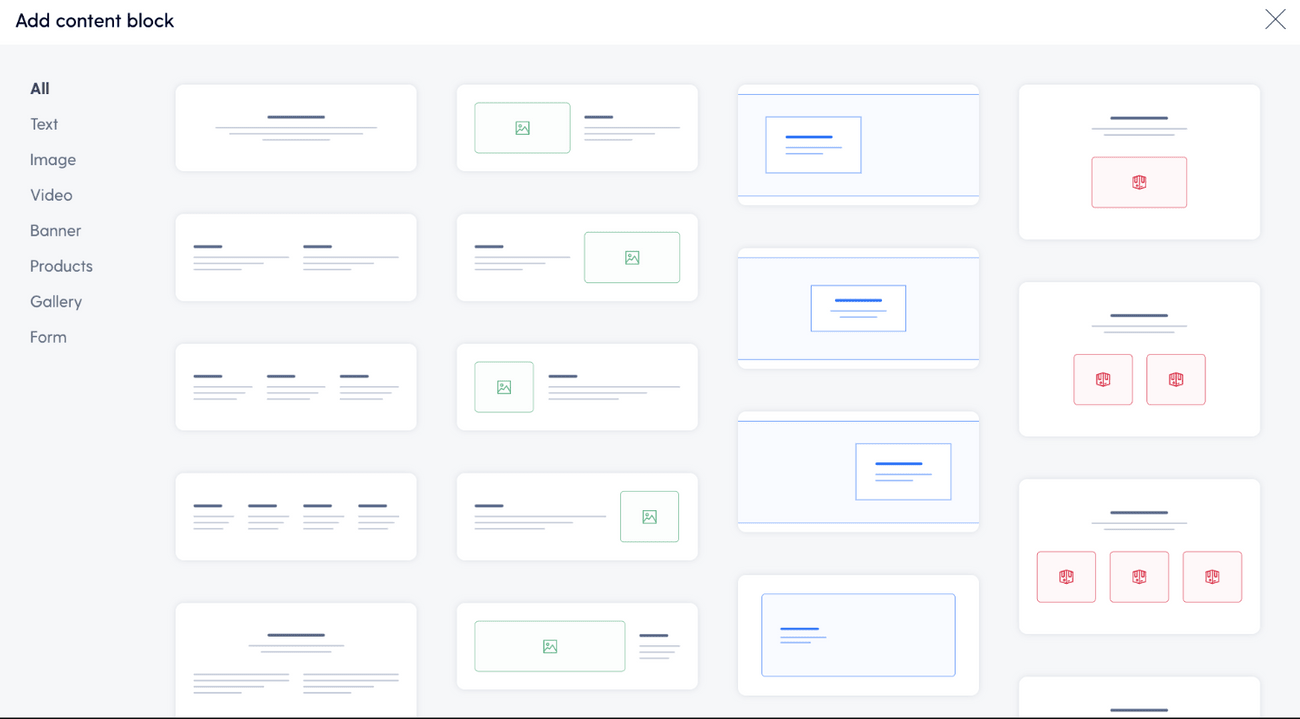
Next, select the layout for your page – Mozello provides a variety of design options. Consider whether you prefer a header image and how you would like to arrange the text. Feel free to explore and determine which layout best aligns with the information you want to showcase on your e-store:

Note: Pay attention that the rectangle highlighted in green is your banner image.
Once you've chosen your front page layout, customize it further:
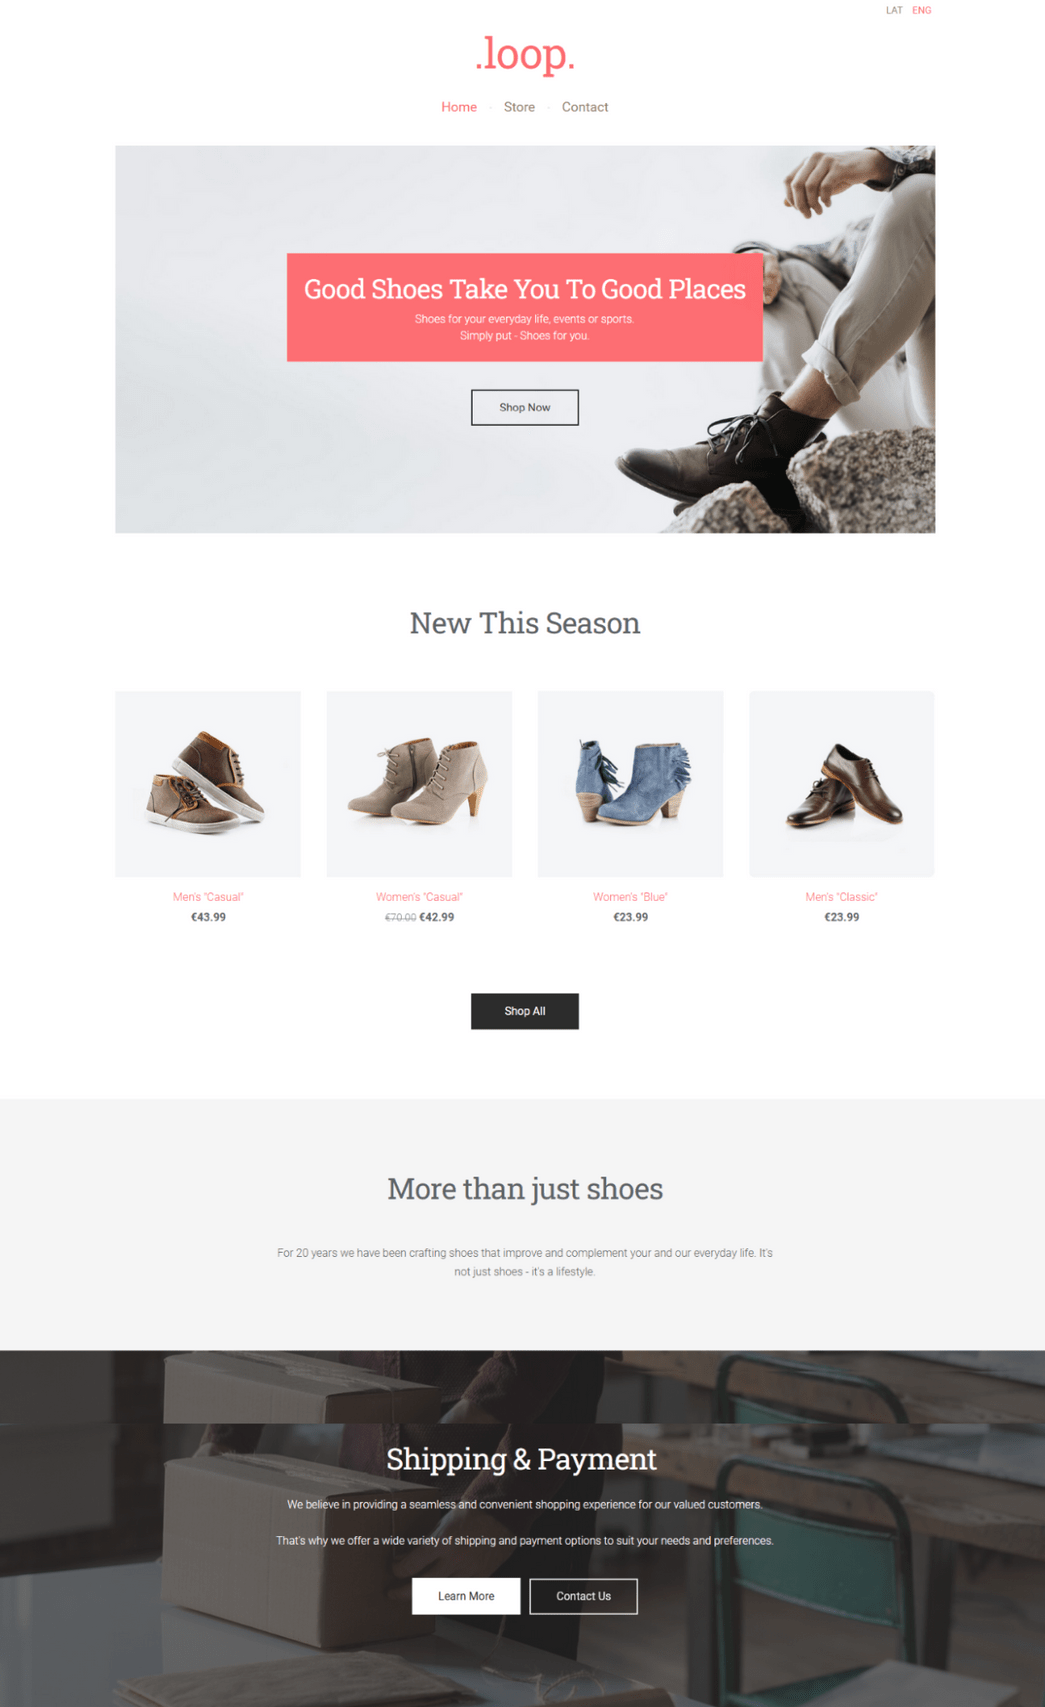
- Upload your header image – take a moment to reflect on whether it conveys the essence of your company and clearly communicates WHAT you do
- Add a call-to-action button to drive action (e.g., adding a product to a cart or buying it)
- Customize content blocks by incorporating images, videos, and call-to-action buttons. To do this, simply click on the content block you wish to customize
- Modify your layout by adding or removing content blocks, such as additional text, a product gallery, or a sign-up form. To achieve this, click "Edit layout" and use the "+" sign to add a new block
To enhance the visibility of your website on search engines like Google, it's important to perform basic SEO on your pages. This involves optimizing your titles, meta descriptions and tags with keyword-rich content.
Go to Pages → choose the page you want to optimize → click Advanced Settings.
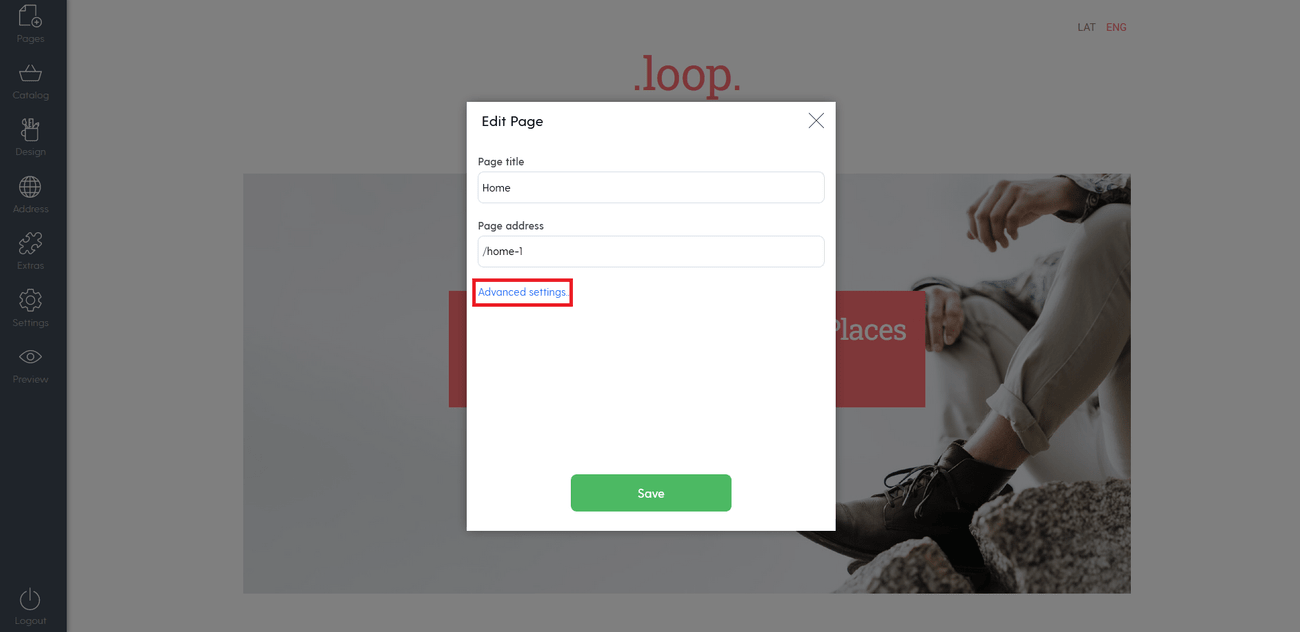
Make sure your titles and meta tags include business-specific keywords. That is, if you sell footwear, use this and other related keywords – shoes, boots, sandals, etc. – in your description.
In a nutshell:
- The title tag should accurately describe what visitors will find on the page when they click on the search query from Google. In our case, it's "footwear"
- The meta description complements the title tag and aims to entice users to click. Use this space to highlight the unique benefits of your products and provide compelling reasons why visitors should explore your online shop
What to write in the website copy?
Tell visitors what you sell and why they should buy it from you:
- Write descriptive and catchy headlines
- Showcase the best features and selling points of your product
- Make sure your calls to action are clear and understandable
Pro tip:
A truly good website copy focuses on benefits, not plain features. Remember that people more often buy with emotions, which is why we say ''Good shoes take you to good places'' (sells the benefit) instead of ''high-quality footwear'' (sells the feature).
Need help with your website copy? Check out our article on how to write effective website copy.
With that, the design of your main page is now complete!
Step 3: Add products to your shop
Now that your homepage is set up, it's time to add some products to your site, allowing people to browse and make purchases. Follow the step-by-step guide below to do it.
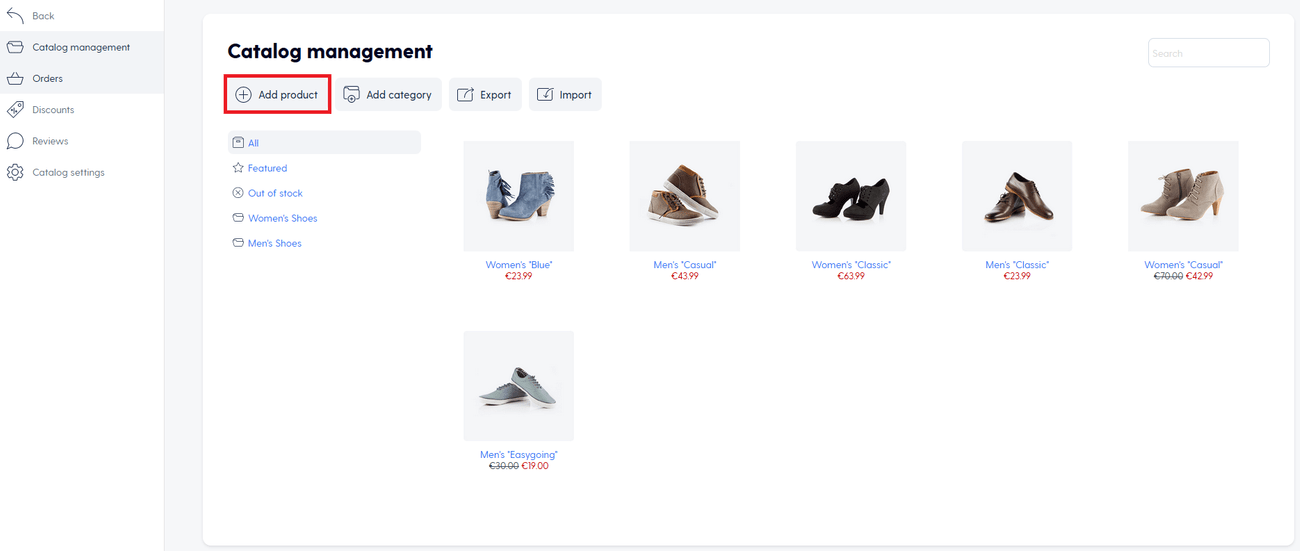
1: Add products
To add products to your shop, go to Catalog → Add product:
Write your product title and add a product description. If you need help crafting persuasive product descriptions that drive sales and achieve high rankings on Google, you can refer to this article.
Nowadays, we also have the option to use ChatGPT for generating and enhancing product descriptions. By providing key information about a product, ChatGPT can craft engaging descriptions that effectively highlight the features and advantages of the item. It's particularly useful for ecommerce stores with large catalogs and for store owners with too much on their plate. While using the generated content, make sure to adapt and modify it according to your specific requirements – adding a human touch is a good idea in most cases.
2: Add product images
Product photos can determine the success or failure of a potential sale. Research suggests that only 16 percent of website readers read the text in its entirety, while 79 percent prefer to skim and pay attention to highlights, such as images.
Enhance your product's selling potential by including a greater variety of product images from different angles. Plus, ensure that your product photos have a professional and high-quality appearance.
The good news is that you don't have to hire a photographer to create professional-looking product photos. Follow this guide and learn how to capture them yourself right from the comfort of your home!
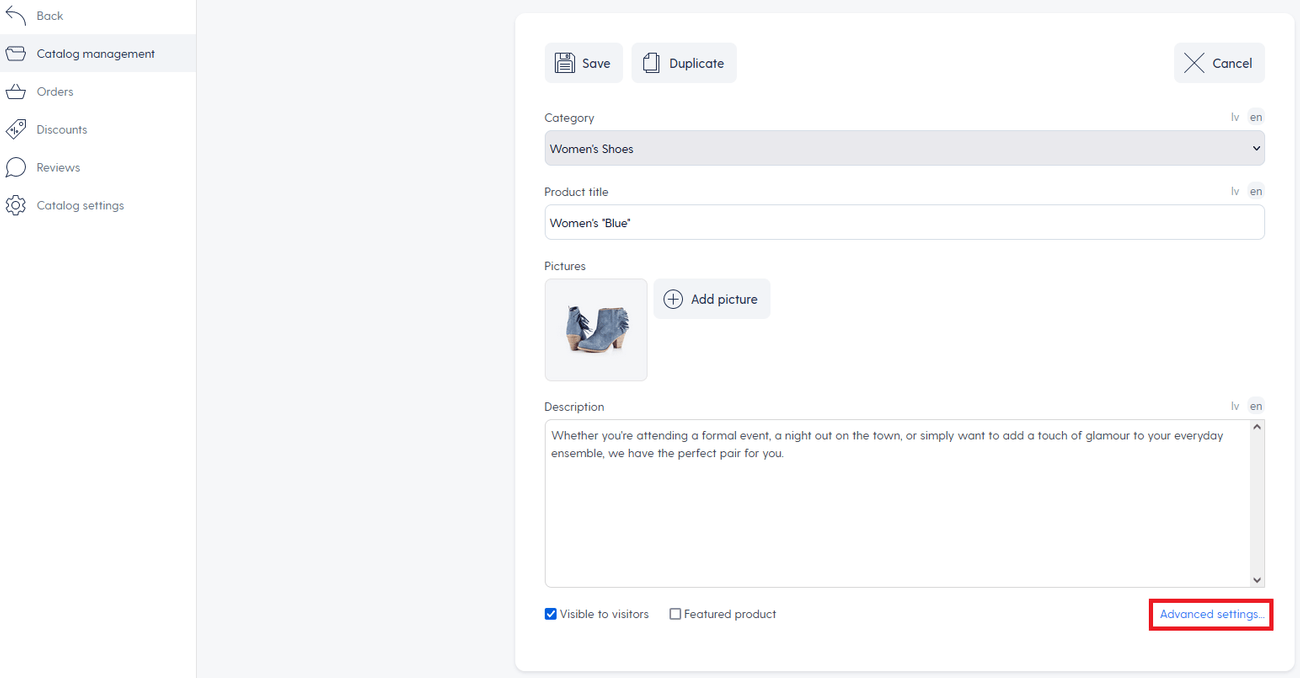
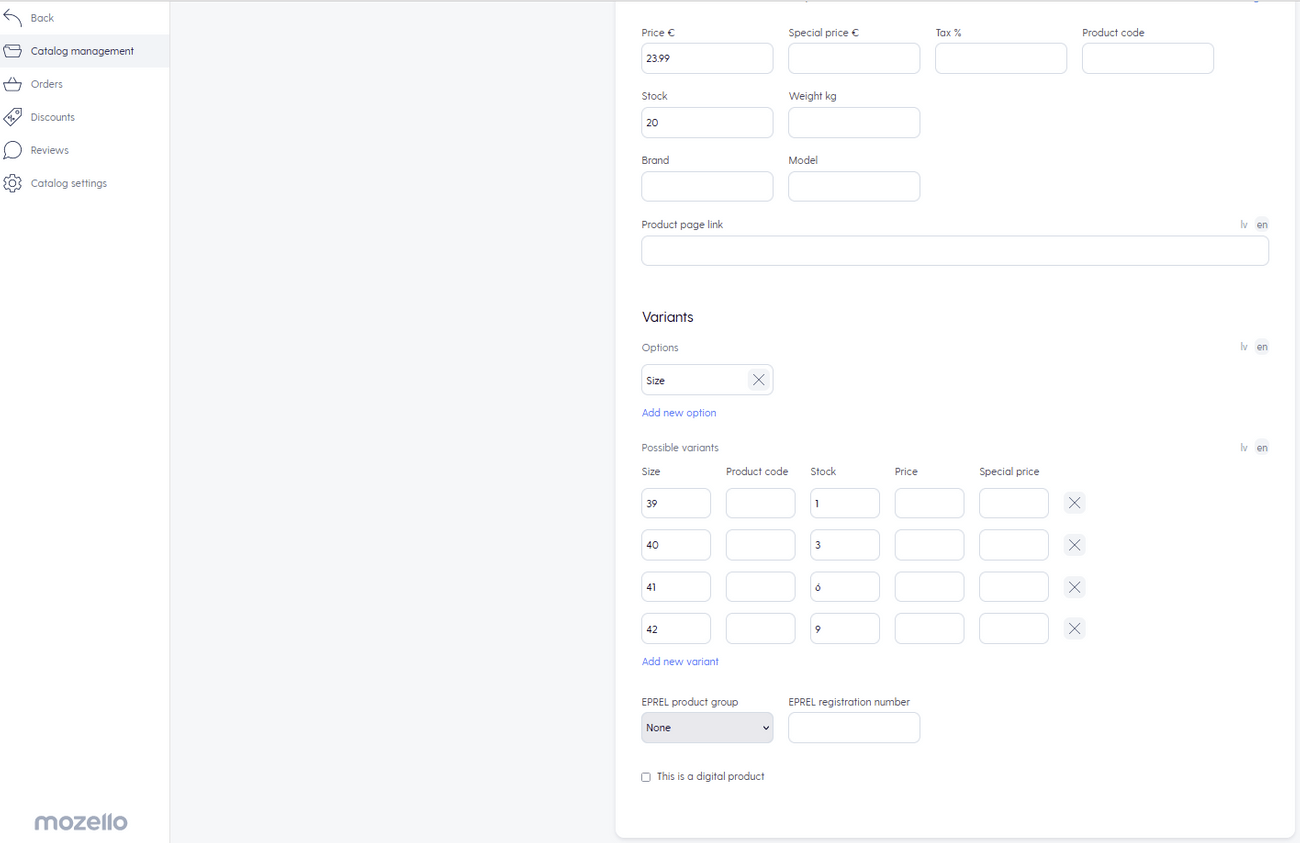
When the copy and images are in place, scroll down and click ''Advanced settings'' to show the price or add product variations (e.g., if you sell the same product in different colors or sizes, add all the options here).
Click on the "Save" button to add your product.
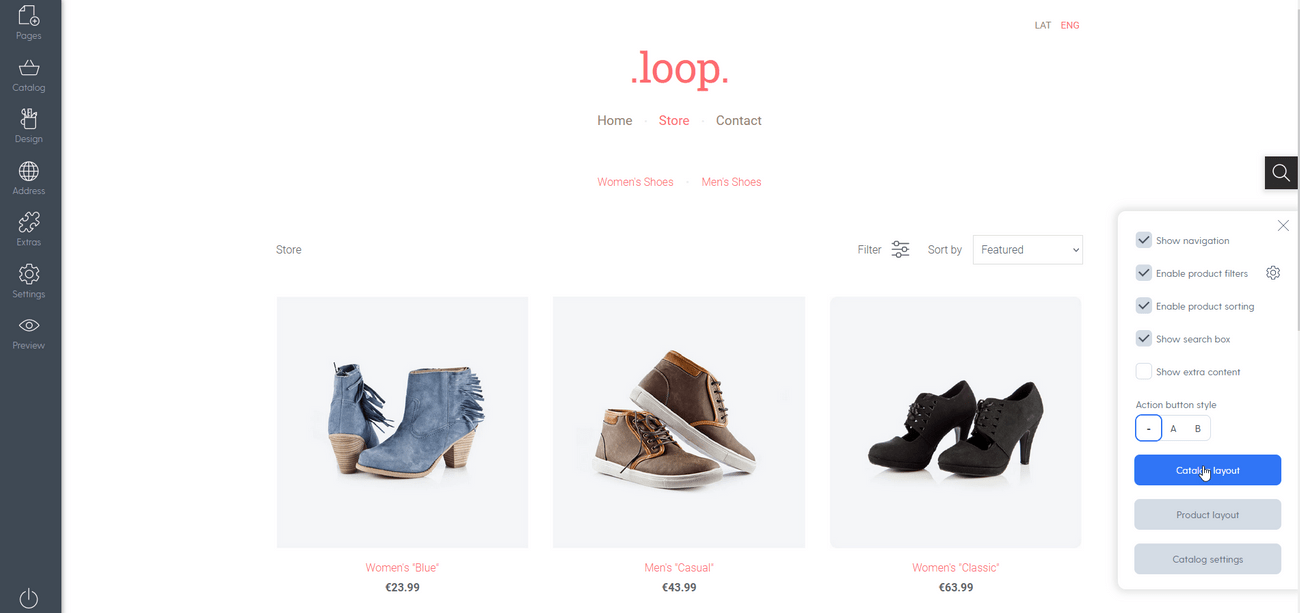
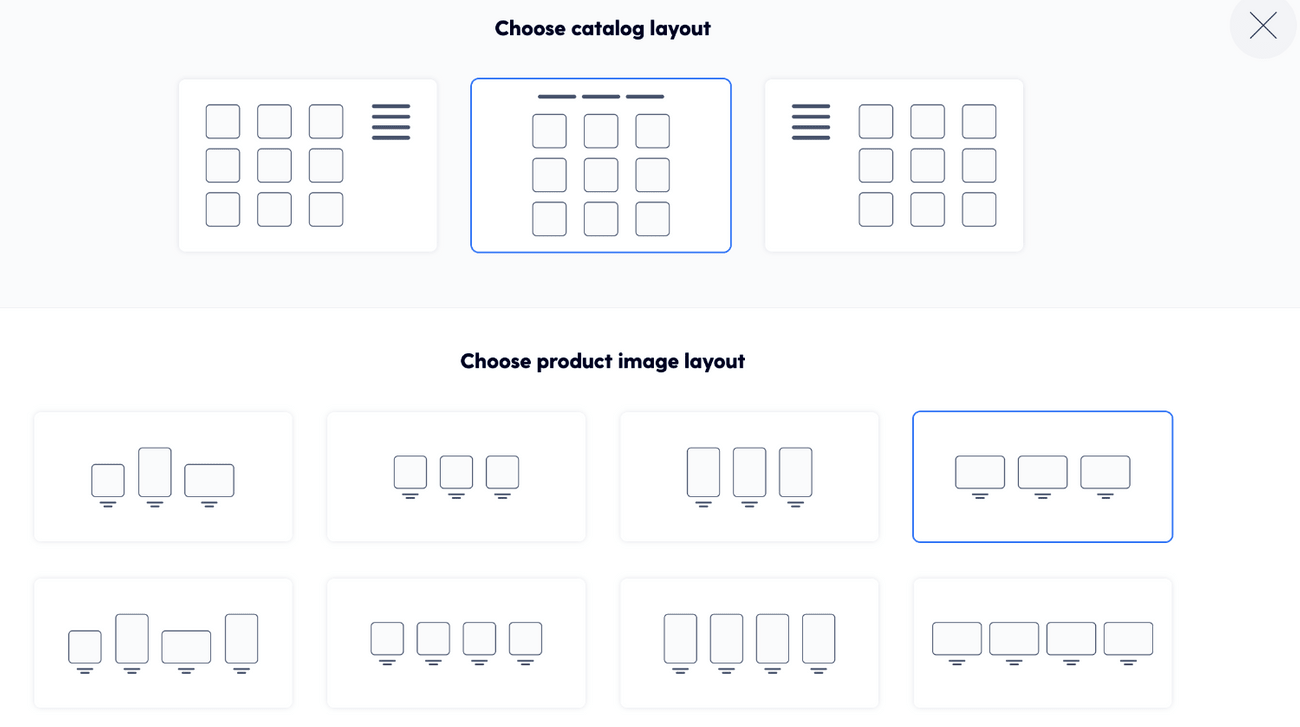
3: Adjust catalog and product layout
You can adjust the layout based on the nature of your products, the number of items you sell, and the orientation of your product images (horizontal or vertical).
For instance, if you have a large inventory, a layout with four products per row is suitable. On the other hand, if you offer only a few items, changing the layout to three images per row can create a ''fuller'' and more visually appealing display.
If your products have intricate details that you want customers to notice when browsing the catalog view (such as jewelry), it's recommended to opt for fewer and larger images per row.
Feel free to customize your product layout to best showcase your offerings and provide an optimal browsing experience for your customers.
To change the layout, go to ''Catalog layout'':
Step 4: Add shipping and other essential information
Ensure that your customers have all the essential information they need to make informed buying decisions and successfully place their orders.
1: Add shipping info
Answer your client's questions before they even ask them, for example:
- Do you offer worldwide shipping?
- What is the estimated shipping time for products within Europe, the USA, or Australia?
- What is the average shipping cost?
- Are customs fees included in the price?
Include all relevant information to ensure that customers are well-informed about what to expect, as unexpected costs added at the checkout can be frustrating.
2: State your terms and conditions
This is where you inform your customers about important details such as:
- Your privacy policy (e.g., how you handle their email address)
- Your use of cookies and monitoring (if applicable)
- Any specific rules or restrictions that apply to the product (e.g., no reselling, age restrictions)
- Your policies for returns and refunds
Pro tip:
You can search for a sample template online, thoroughly read through it, and customize it according to the needs of your business and products.
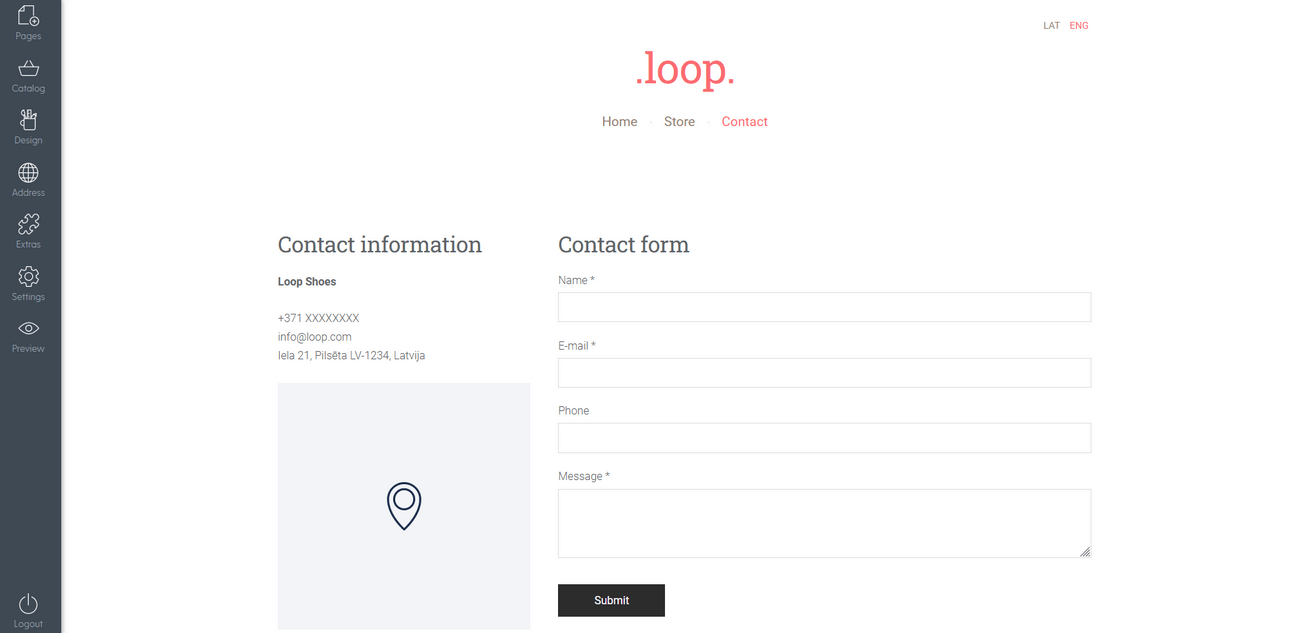
3: Add your contact information
Easy-to-find contact information makes your business look transparent, trustworthy, and reliable. By providing convenient channels for customer contact, you empower them to make informed purchasing decisions.
Give people various options to contact you:
- A user-friendly contact form
- Your office phone number
- Your email address
- Your business address, along with a map indicating your location
Step 5: Add payment & delivery options (+ provide a discount)
With your store set up and products added, the next step is to enable customers to place orders and select their preferred delivery method.
1: Add delivery options
When adding a delivery method, you have the flexibility to configure various parameters:
- Description: define your delivery method – try to make it self-explanatory
- Delivery service provider: choose from a range of available providers
- Cost: set the cost associated with the delivery method
- Minimum and maximum order amount: define the order value range for which this method is valid
- Minimum and maximum order weight: specify the weight range for which this method is applicable
- Valid countries: determine the countries for which this delivery method is available
To add a delivery option, go to Catalog Settings → Delivery → Add new delivery method.
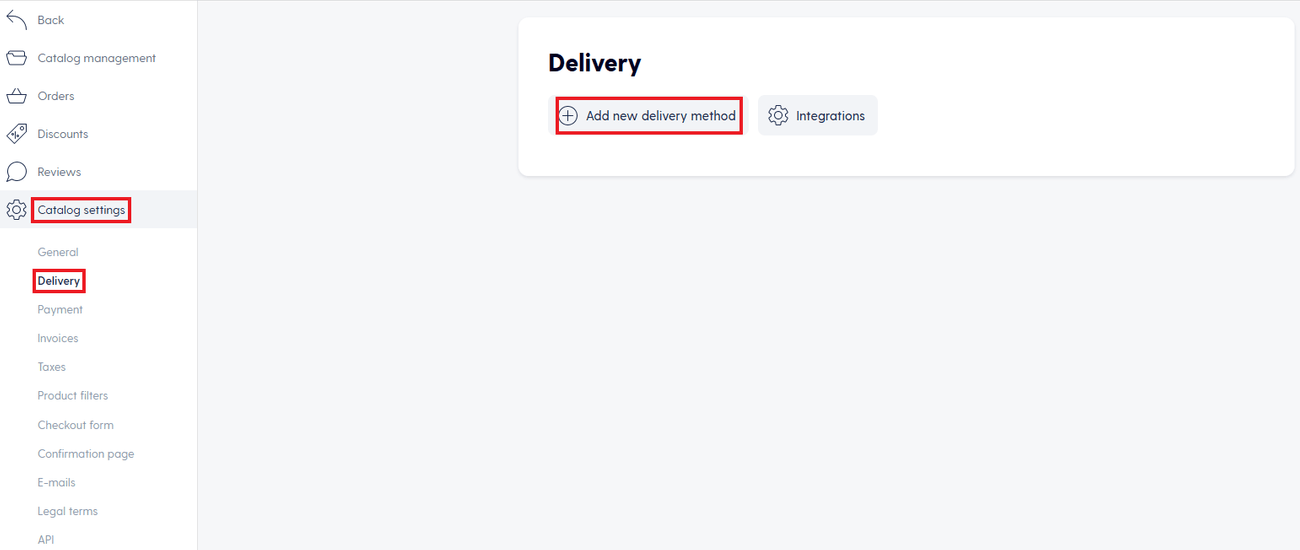
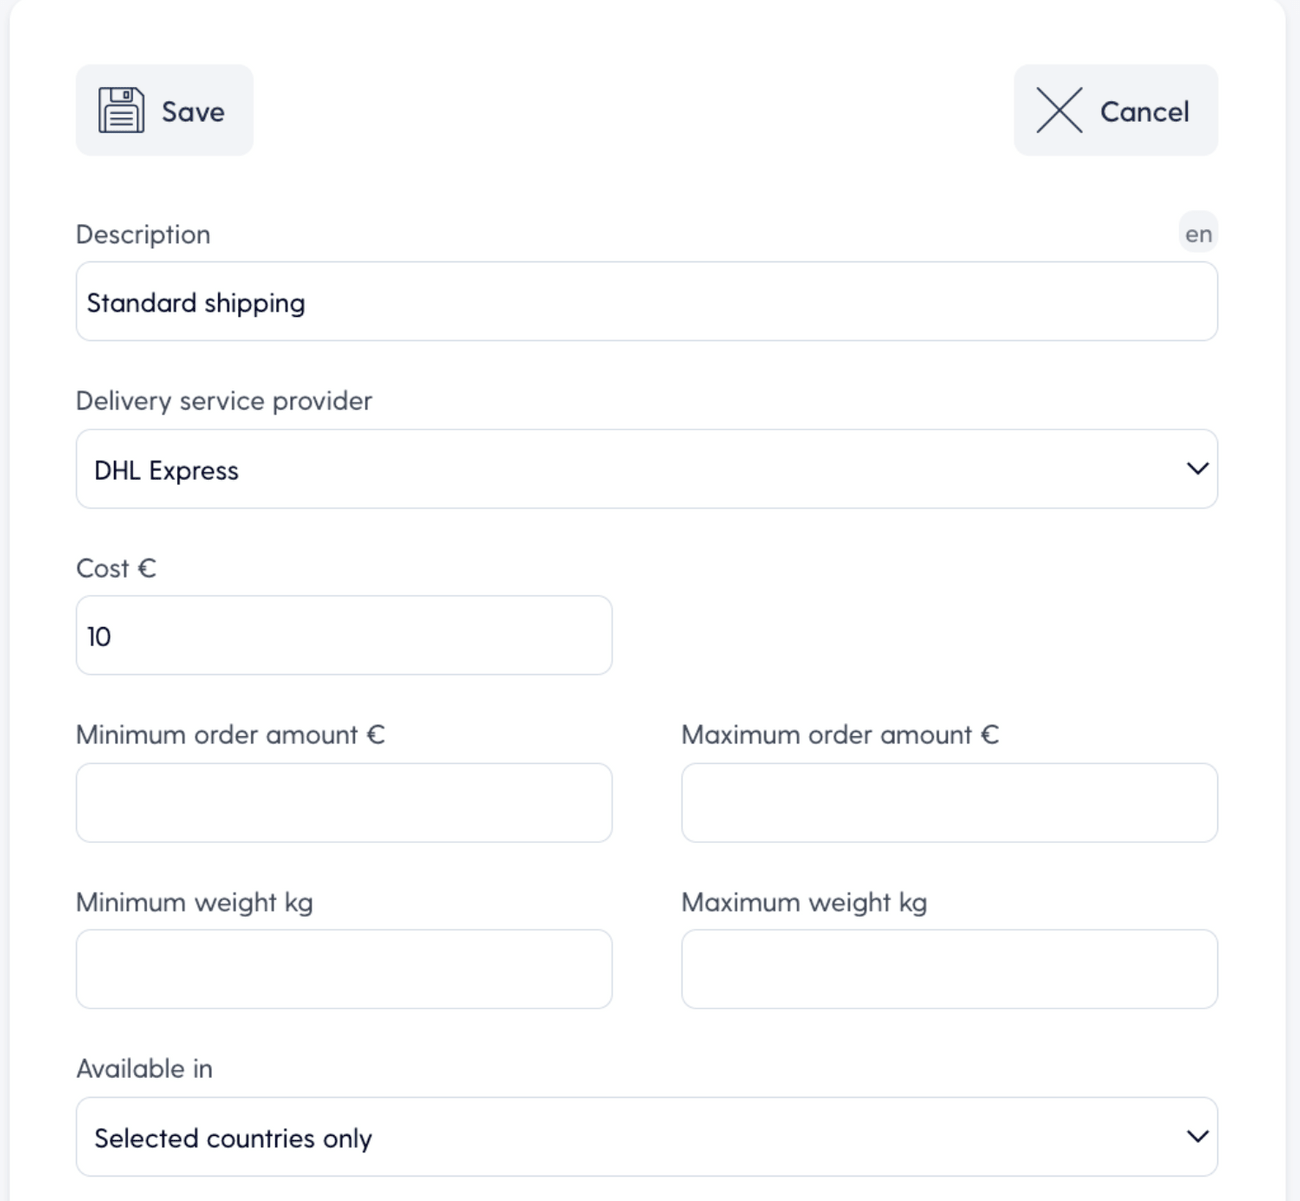
After filling in all the relevant information, click ‘'Save":
It’s a good idea to offer a variety of delivery options for your customers to choose from. Ideally – a selection that includes faster but more expensive options, slower but more affordable options, and a middle-ground choice. By doing so, you empower your customers with flexibility in choosing how they receive their purchases.
2: Add payment methods
To add payment methods, go to Catalog Settings → Payment.
Mozello supports various payment methods, including PayPal, bank transfer, cash on delivery, and card payments (available for Premium Plus users).
If want to enable PayPal payments, simply copy and paste your PayPal account email address:
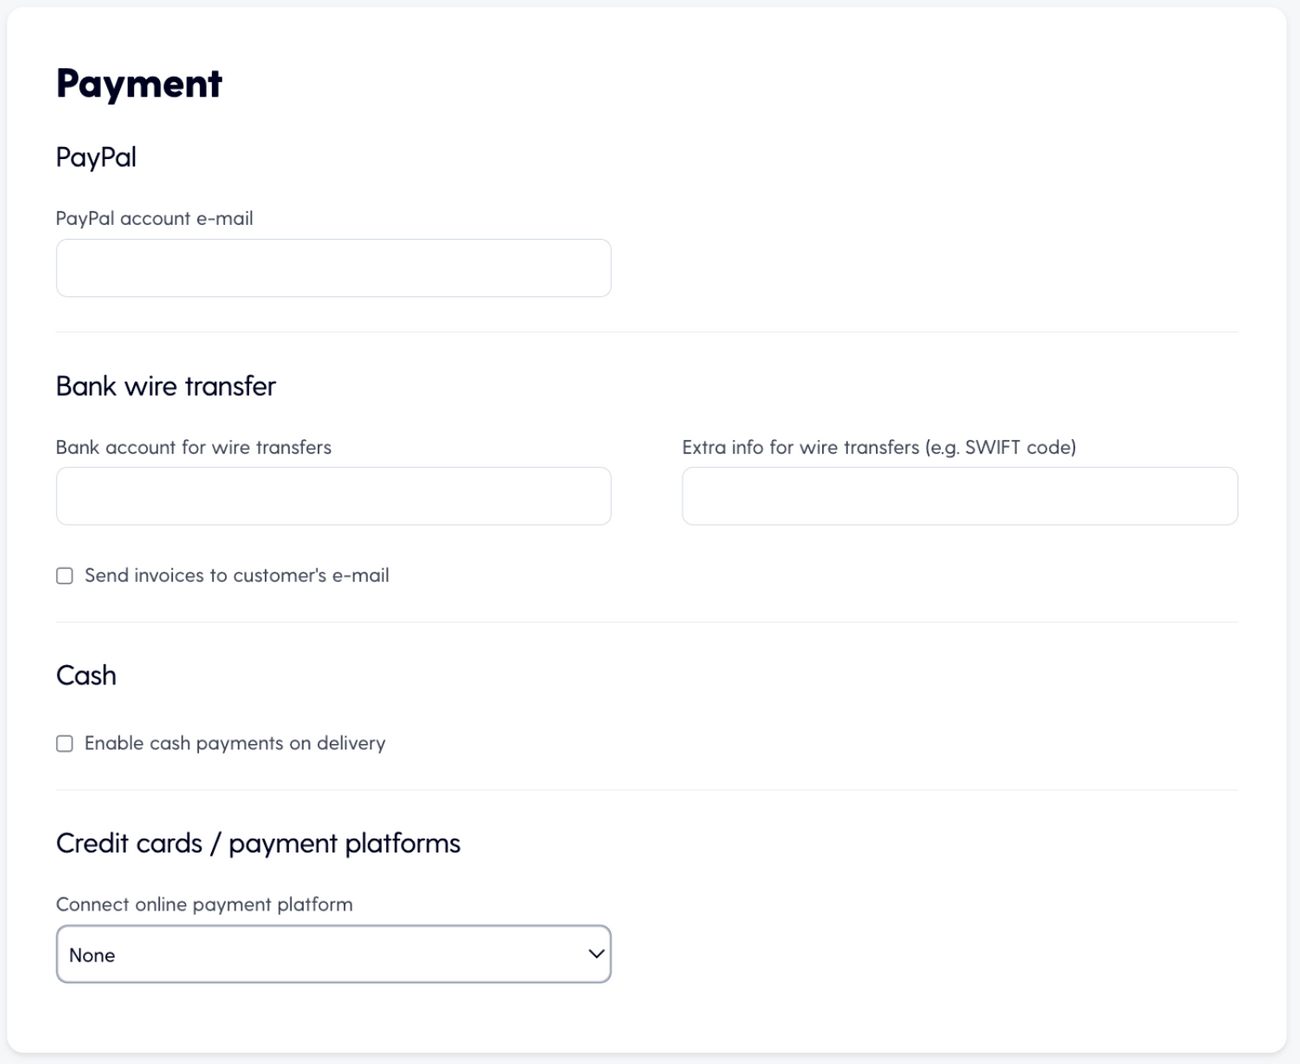
To enable card payments, you'll need to create an account with one of the supported payment platforms and connect it to Mozello.
For example, to accept payments via Stripe, create a Stripe account and connect it to Mozello. It's a quick and easy process that takes just a few minutes.
In the catalog settings, you also have the option to:
- Select the currency for your store (e.g., euro or US dollars) to accept payments in your preferred currency
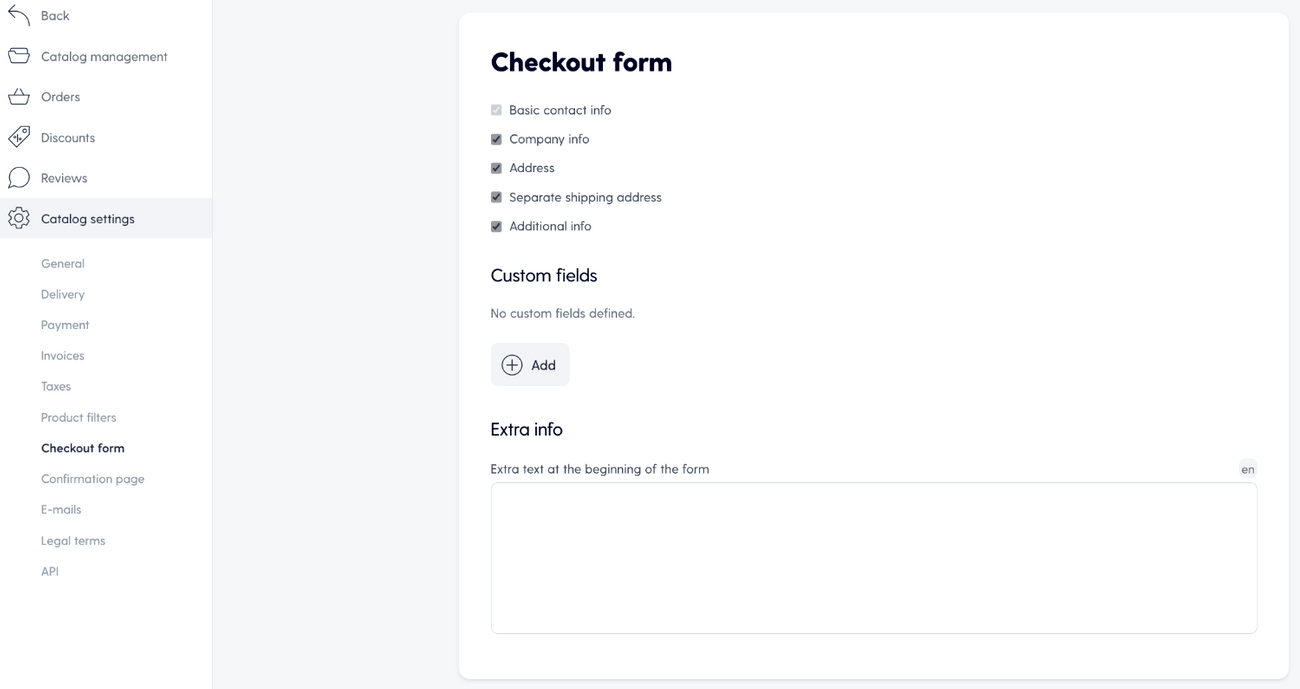
- Decide whether to include taxes in your product price or charge them separately
- Customize the checkout form by adding or removing fields, ensuring you gather only the necessary information from customers
3: Provide a welcome discount (optional)
Providing a welcome discount is a great strategy to entice new customers. Once your shop is up and running, you can use social media platforms and relevant forums to spread the word about the fantastic deal customers can enjoy when shopping with you for the first time.
To create a discount code, navigate to Catalog → Discounts → Create discount:

Each discount code can be customized based on specific parameters:
- Discount amount (either a fixed monetary value or a percentage)
- Minimum order amount required to qualify for the discount
- Number of times it can be used
- Validity period during which the code remains active
- Whether it can be applied to the entire order, specific products, or categories
Customize the form according to your preferences, then click "Save":
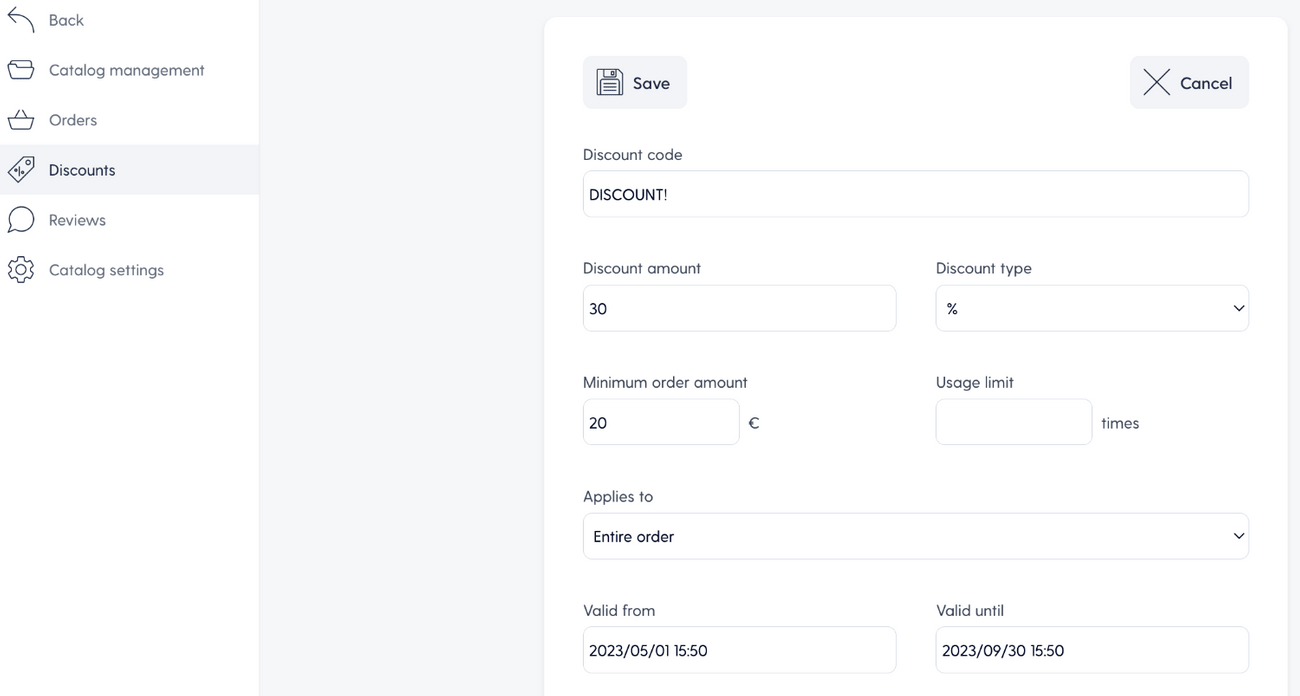
Please note that this feature is exclusively available for Premium Plus users.
Remember that you can use discounts beyond the initial welcome period. When used strategically, offering discounts can be a powerful tool to influence potential customers – dive deeper into this topic by reading this article.
Step 6: Tweak some additional store functions
To enhance your e-store's functionality, we'll guide you through configuring product filters, sorting options, and introducing customer reviews and email features.
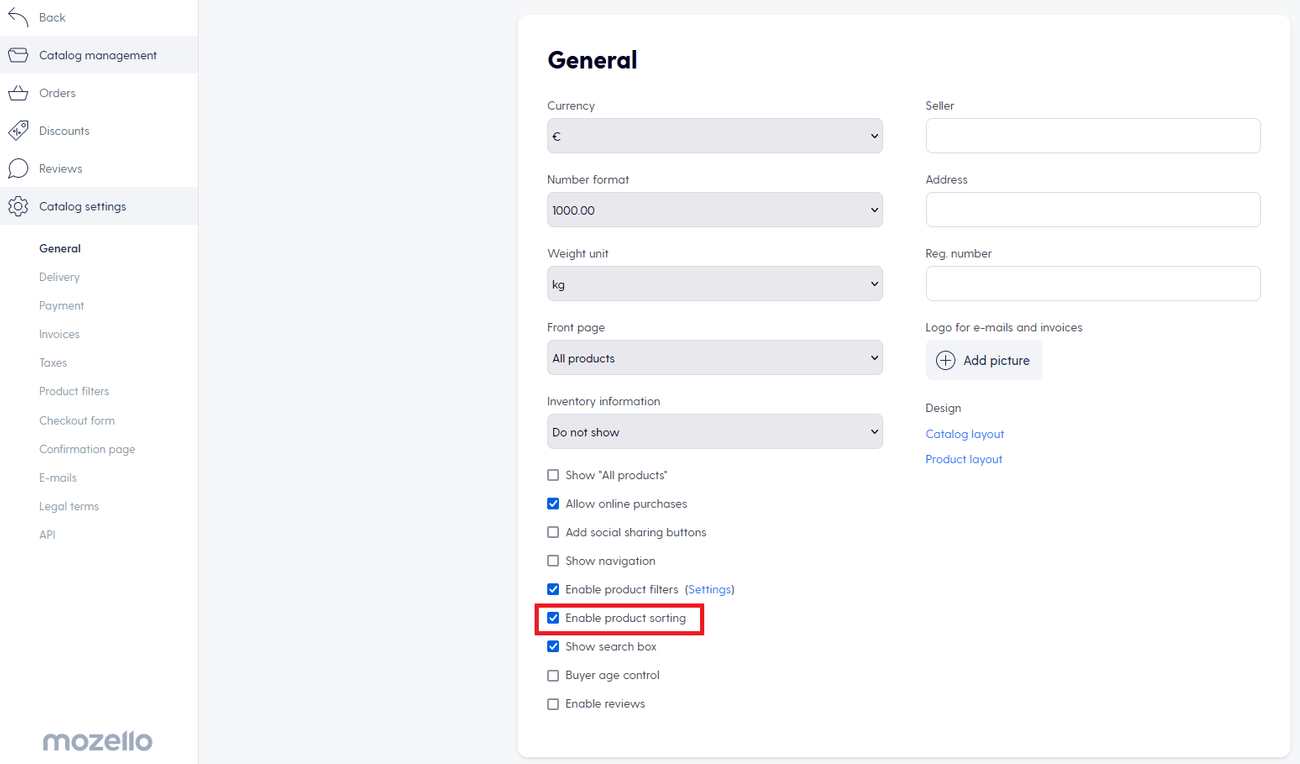
1: Product sorting
This function allows customers to sort products based on criteria such as price (e.g., lowest to highest), placement date, and recommended products (in the order set by the store owner).
Sorting can be enabled or disabled by checking the box in the section:
Catalog → Catalog Settings → General
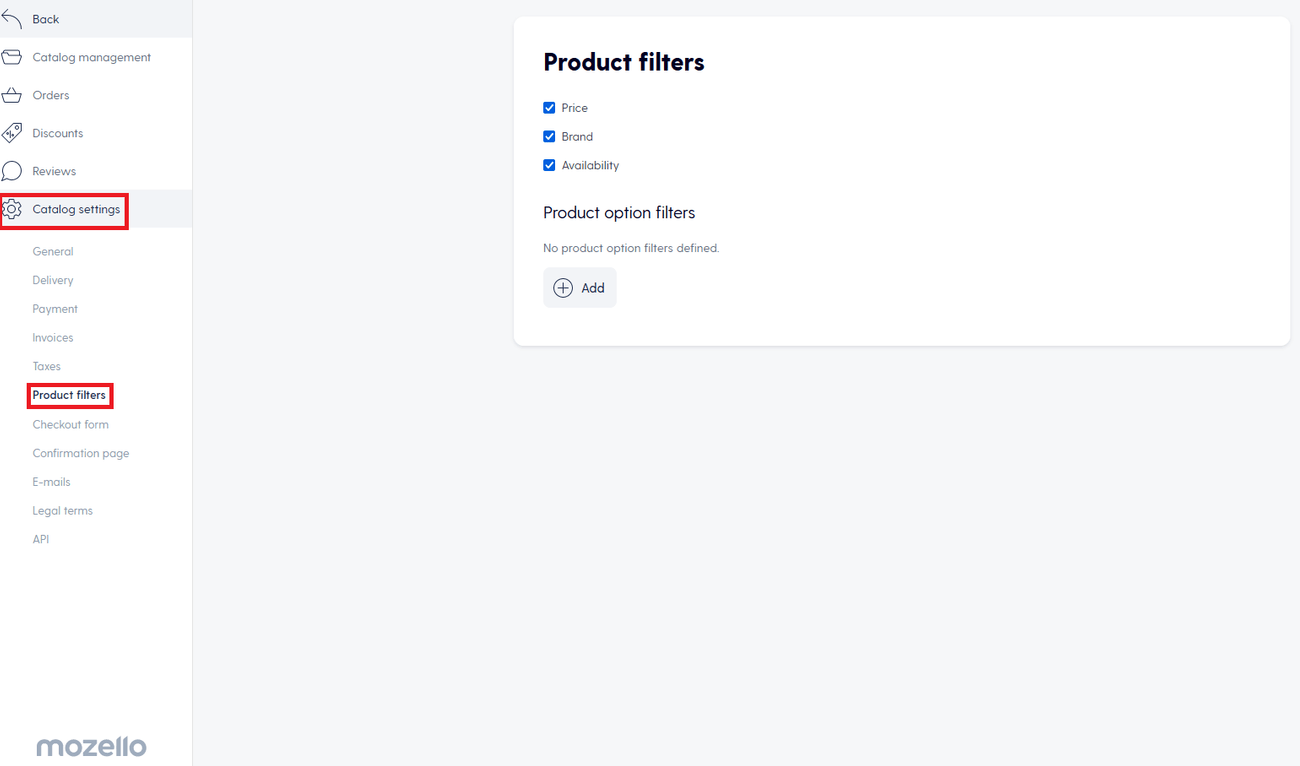
2: Product filters
This option allows shoppers to browse and select store products according to different criteria and available options that you have specified.
For instance, by:
- price (using a slider)
- availability
- brand
- color
- size
Filters can be enabled or disabled by checking the box in the section:
Catalog → Catalog Settings → General
You can create and customize filters in the section:
Catalog → Catalog Settings → Product Filters
You can use filtering based on default product parameters such as price, brand, availability – and variant attributes like size and color.
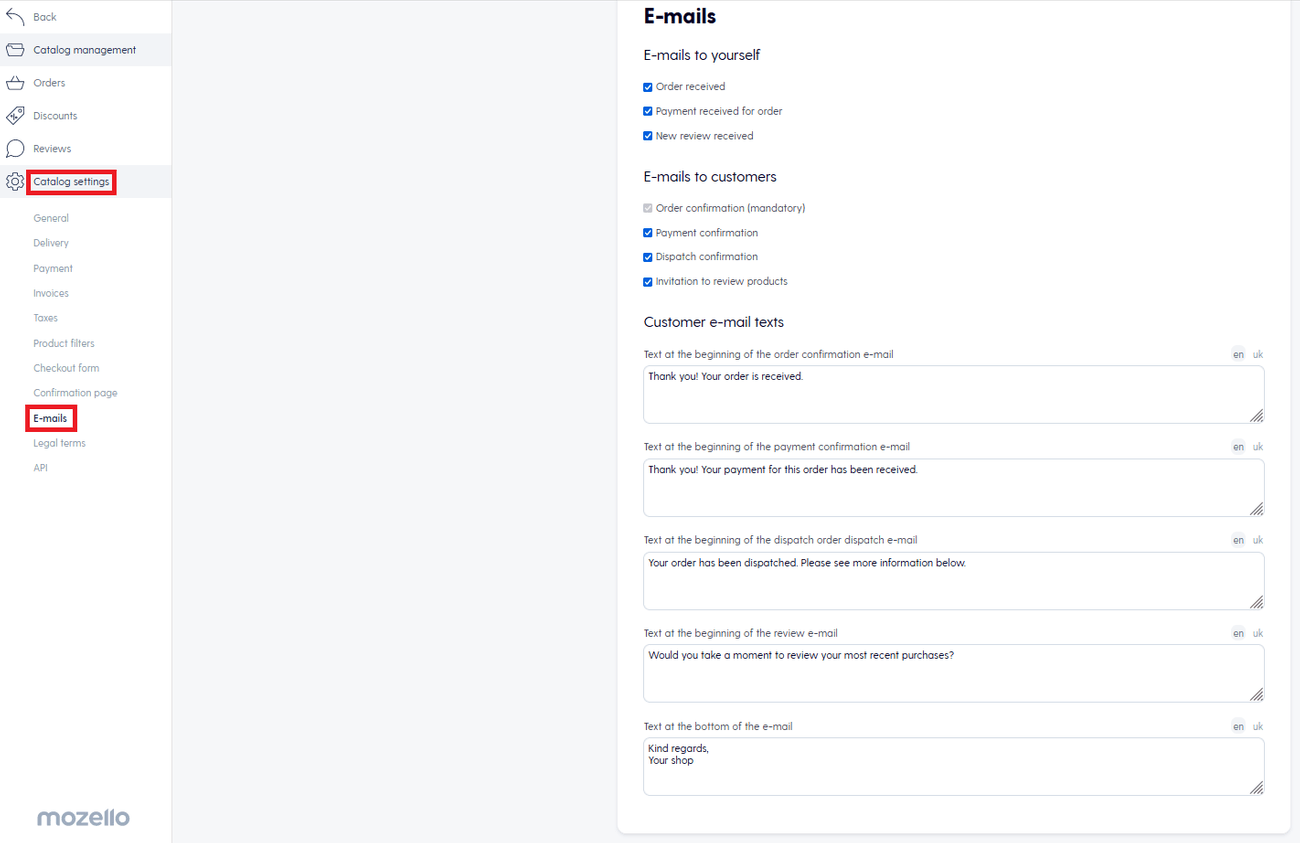
3: E-mail notifications
Mozello supports email notifications to ensure you and your customers stay informed about shopping activities.
There are four types of customizable email messages available for your clients:
- Order confirmation (mandatory)
- Payment confirmation (optional)
- Product delivery information (optional, including delivery and tracking numbers)
- Invitation to review products they have purchased (optional)
Do not underestimate the significance of post-purchase emails – they present a valuable opportunity to upsell and cross-sell to customers by offering suggestions for other related products.
Store owners can opt for three types of email notifications to stay updated on customer activity:
- Order received notifications
- Payment received notifications
- Review notifications
You can find the e-mail options here:
Catalog → Catalog settings → E-mails
4: Reviews
Collecting customer feedback is a great way to gain insights into what you're excelling at and areas where improvements can be made. The reviews left by previous customers are also highly influential in the purchasing decisions of your e-store visitors. Research indicates that 82% of people admit to reading online customer ratings or reviews before making their initial purchase.
In short, it's probably a good idea to enable customer reviews on your site.
To do this, navigate to Catalog → Catalog settings → General and select the appropriate checkbox:
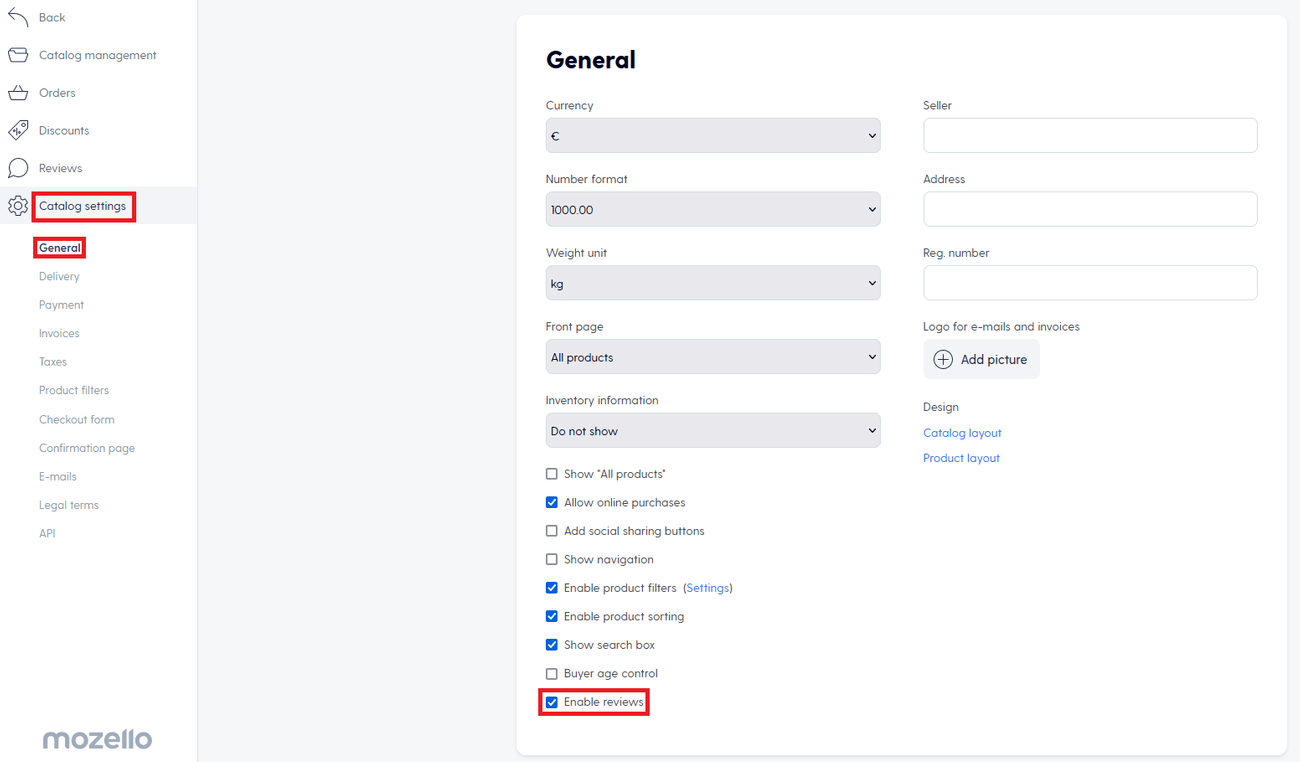
All received reviews will be conveniently accessible through the dedicated menu, located at Catalog → Reviews:

Step 7: Launch your site and start selling
Congratulations – Your shop is now prepared for launch and ready to accept orders!
Now it's time to drive traffic to your website and turn those visitors into actual sales. Check out this article outlining seven proven tactics that guarantee success – and transform your website into a thriving sales engine.
Here are a few things you can start with:
- Post on your social media – let your friends and family know you're in business
- Create a Facebook ad (this complete and detailed guide will help you)
- Discover online communities within your industry, and share your store's link in these spaces
Best of luck! We're eagerly awaiting your success story in the comments below.
If you have any questions, need suggestions, or require assistance, don't hesitate to contact our support team at support@mozello.com.